
5 Maintenance Mistakes That Ruin PET Production (Includes Free Schedule Template)
A PET injection mold is not just a tool; it is a massive financial asset. If you treat a high-quality S136 steel mold right, it will print money for you for ten years, easily handling 5 to 8 million shots. But if you neglect it, that same investment might turn into a pile of scrap metal in less than two.
Many factories operate on a “break-fix” mentality. They run the machine until it stops, then scramble to fix it. This is reactive, expensive, and stressful. Shifting to a proactive mindset saves budget and sanity.
Below are the five most expensive maintenance errors production managers make, followed by a copy-paste preventive maintenance schedule template to help you get organized.
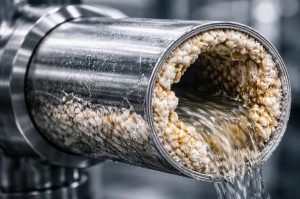
1. Ignoring Scale Buildup in Water Channels
It is easy to focus on the shiny parts of the mold that you can see. However, the real danger often hides inside the cooling channels where you cannot look. Over time, minerals in your cooling water deposit on the channel walls, forming scale.
Think of scale as an insulator. A layer of scale just 0.5mm thick can reduce heat transfer efficiency by up to 40%. When heat cannot escape, the cycle time drags on. Worse, the uneven cooling leads to physical defects. You might start seeing opacity or haze in the preforms.
If you are trying to troubleshoot blow molding defects, check your water lines first. Blocked channels are often the silent culprit behind crystallinity issues that kill bottle quality.
The Fix: Do not wait for a blockage. Schedule regular acid flushing (descaling) for your mold’s water lines. Monitor the flow rate at the inlet and outlet; if the difference drops, it is time to clean.
2. Over-Greasing Blocking the Vents
There is a common misconception among junior technicians that “more oil is better.” They slather grease on the guide pins and bushings, thinking they are protecting the mold.
This is a mistake. Excess grease does not stay put. As the mold heats up, that grease migrates. It finds its way into the vents (the tiny gaps designed to let air escape). When vents get clogged with a mix of oil and dust, the air inside the cavity has nowhere to go during injection.
The air gets compressed, heats up, and burns the plastic. This causes the “Diesel Effect,” leaving black burn marks on your preforms. Plus, oil dripping into the cavity causes contamination, leading to immediate scrap.
The Fix: Use a “less is more” approach. Switch to dry Teflon sprays or specialized high-temperature food-grade grease. Wipe away old grease before applying new, and keep those vents clear to avoid common PET preform defects like burns and short shots.
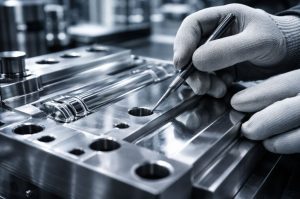
3. Using Metal Tools on Mirror Surfaces
It happens during every shift. A preform gets stuck on a core, or some plastic drool sticks to the parting line. In a rush, the operator grabs the nearest tool—often a steel screwdriver or a copper rod—to pry it off.
Stop this immediately.
PET molds, especially the core and cavity surfaces, are polished to a mirror finish. While S136 steel is hard, it is not invincible. A steel screwdriver will scratch the surface instantly. Even a small scratch can cause “undercuts,” making the plastic stick even more during ejection. It becomes a vicious cycle: stick, pry, scratch, stick more.
The Fix: Enforce a strict “Soft Tool Policy.” Only allow tools made of bamboo, soft copper, or brass near the open mold. If plastic is stuck hard, use a heat gun to soften it first, never force.
4. Treating the Hot Runner as a “Black Box”
The hot runner system is the heart of your PET mold, yet it often gets ignored until a heater band burns out.
If you don’t calibrate your temperature controllers, the actual temperature of the melt might be different from what the screen says. If it is too hot, the PET degrades, causing high Acetaldehyde (AA) levels or a drop in Intrinsic Viscosity (IV). If it is too cold, you risk high injection pressure and gate stress.
The Fix: Don’t just set it and forget it. Regularly check the resistance of the heating elements. Inspect the valve gate seals. A leaking valve gate piston is a nightmare that fills your manifold with plastic, leading to days of downtime for a complete teardown.
5. Skipping Rust Protection During Shutdowns
It is Friday afternoon. Production stops for the weekend. The operator turns off the machine and goes home.
By Monday morning, the mold is ruined. Why? Condensation.
If you leave cold water sitting in the channels, or if the mold surface is cool in a humid factory, moisture collects on the steel. This leads to pitting corrosion on the parting line and vents. Once pitting starts, it creates flash on the bottle neck, which is notoriously hard to repair.
The Fix: Create a shutdown SOP. Always shut off the cooling water and blow the channels dry with air. Before closing the mold, spray a generous layer of anti-rust inhibitor on all molding surfaces.
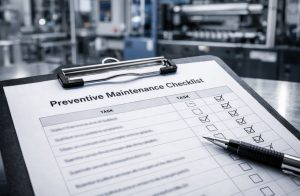
Your Ultimate PET Mold Preventive Maintenance Schedule Template
You don’t need to waste time searching online for a generic preventive maintenance checklist template excel file that might not fit your industry. We have compiled a standard preventive maintenance log sheet specifically for PET injection molding.
You can copy the items below into your own spreadsheet to create a solid preventive maintenance schedule template.
Daily Preventive Maintenance Checklist
-
Safety Check: Verify low-pressure mold protection is working.
-
Cleaning: Wipe parting lines and molding surfaces with a clean, lint-free cloth. Remove any flash or dust.
-
Lubrication: visually check guide pins and bushings. Apply a thin film of grease if dry (do not over-grease).
-
Cooling: Check all water hoses for leaks. Ensure water flow is unrestricted.
Hot Runner: Check for any plastic leakage around the nozzle tips.
Weekly & Monthly Preventive Maintenance Checklist
Weekly Tasks:
-
Clean the air vents (gas slots) with a solvent cleaner.
-
Inspect leader pins and bushings for signs of wear or galling.
-
Check all screws and bolts on the mold base; tighten if loose.
Monthly Tasks:
-
Water System: Backflush cooling channels to remove scale. Use a descaling agent if flow is reduced.
-
Electrical: Measure and record the ohms (resistance) of all heater bands and thermocouples. Replace any that are drifting out of spec.
-
Machine Maintenance Checklist: Inspect the platen parallelism and injection alignment to ensure they aren’t stressing the mold.
The High-Precision Alternative in Foshan
Maintaining a mold is much easier when the mold is built correctly in the first place. HEYAN TECHNOLOGY (Foshan Heyan Precision Mold Technology Co., Ltd.) designs molds that respect the maintenance team’s time.
We don’t just sell you steel; we provide a production system. Our maintenance-friendly multi-cavity molds feature standardized interchangeable parts, meaning you can swap out a worn core or neck ring in minutes, not hours. We use genuine high-grade steel that resists corrosion and wear better than budget alternatives. If you want a mold that stays profitable year after year, we are the partner you need.
FAQ
Q1: How often should I fully disassemble the mold for cleaning?
A: A full pull apart is usual each 12 months or each 1 million shots, what comes first. This lets you swap all O-rings, wash the hot runner path deep, and peek inner bits for tire.
Q2: Can I use WD-40 to clean the mold surfaces?
A: It’s better to skip usual WD-40 for wash mold faces as it can leave a stick that hurts the first few shots of PET. Use a special mold wash (solvent-base) that dries quick without a coat.
Q3: What is the best way to remove rust from a mirror-polished cavity?
A: Skip rough paper or steel fluff. Use a special rust take paste or liquid with a soft cloth. If the holes go deep, the part may need send back to the mold maker for pro shine.
Q4: Do I really need to check the water flow every day?
A: An eye peek for leaks is a day task. Checking the real flow can happen each week. But if you sit in a spot with hard water, holding close watch on flow is the only path to catch scale build before it hurts your run time.
Q5: Why do my guide pins seize up even with grease?
A: This often pops from “stick” caused by odd line or wrong fat type that hardens at hot temps. Peek if your mold plates bend under hold push and change to a hot-temp fake fat with PTFE or molybdenum.
For a technical audit of your current maintenance procedures or to discuss a new project, get a technical consultation with our engineering team today.


