
What Is Insert Injection Molding? a Complete Beginner Guide
Insert injection molding is a useful way to lock metal inserts and plastic together in one molding cycle. You do not need extra pressing or threading steps later. If you work with connectors, gears, or small structural parts, you see this process a lot. This guide walks through the key ideas in simple words, so you can see when the process fits your project and what to check before sending a drawing to a mold shop.
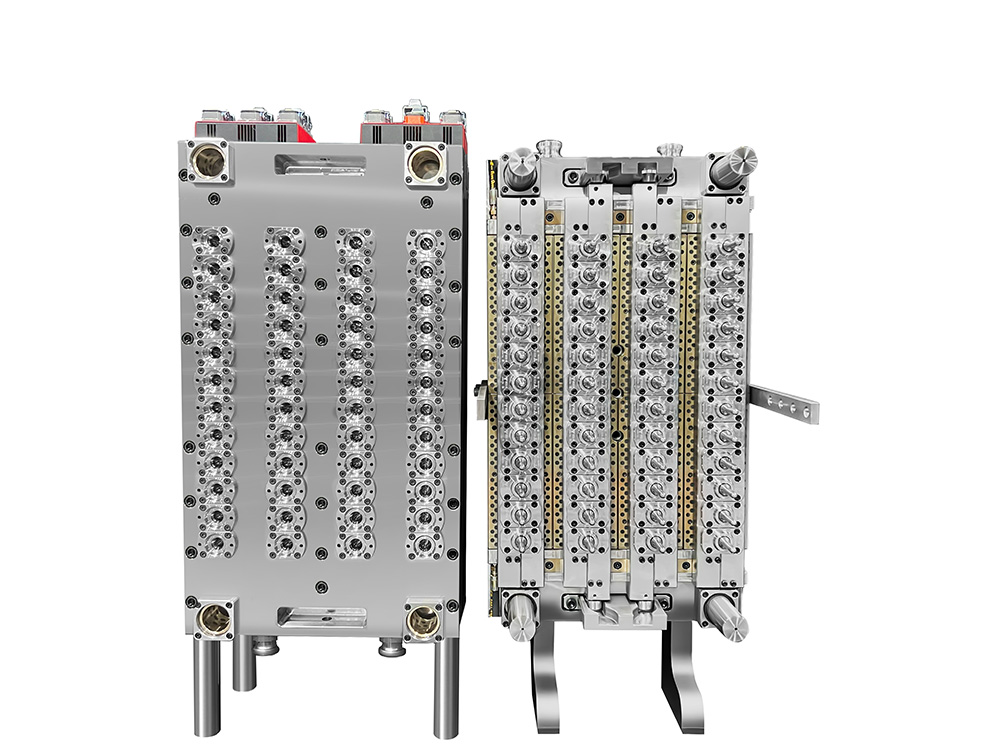
For high-volume projects, insert injection molding is often used together with a multi cavity injection mold so that each cycle can turn out many parts at once and keep the whole line running smoothly.
What Is Insert Injection Molding?
Insert injection molding is an injection molding trick where a ready insert rests in the mold hole. And hot plastic runs around it. After it cools, the insert and the plastic make one bit with both machine and sometimes power roles. For many builders and buyers, this is a simple path to get firm threads, steady touch spots, or a hard metal middle without adding extra gear later in putting together.
Basic Concept and Components
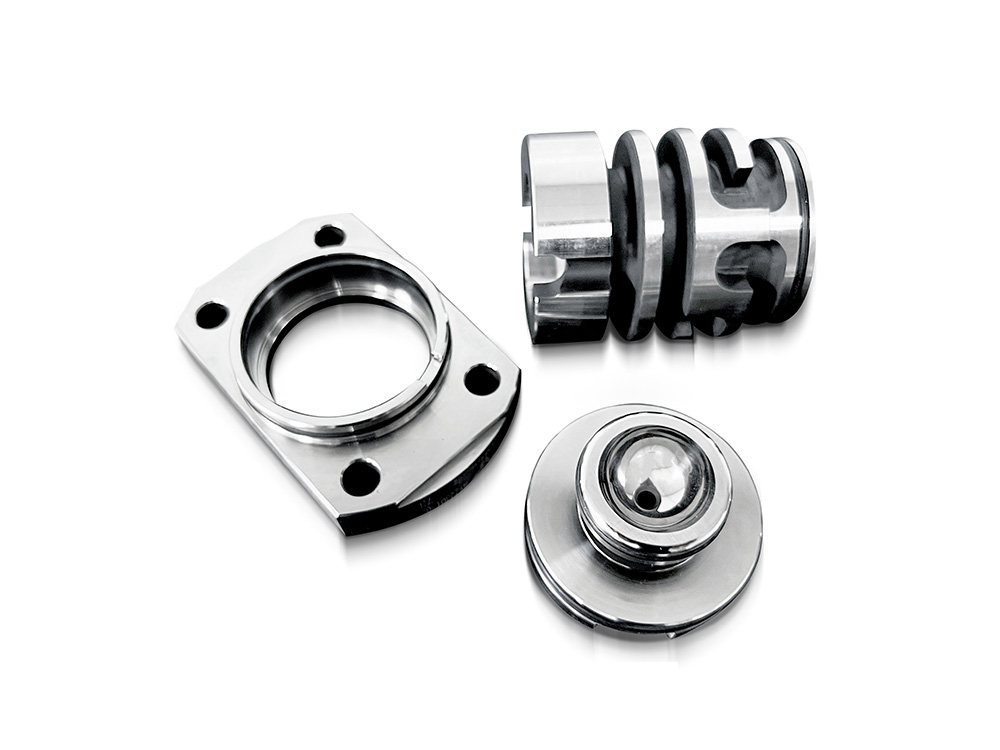
The mold cavity gives the plastic its shape. The inserts bring metal strength or special features. These inserts can be threaded brass nuts, stainless pins, or small stamped parts. Once the plastic flows around them and cools, you get insert molded parts that can handle torque, vibration, or pull-out forces better than parts made only from plastic.
In some projects you also need large quantities of simple housings or covers. In that case, it is common to match insert molded parts with parts made in a multi cavity injection mold. That way the whole group of components stays stable in size and you can keep one clear standard for the final product.
Compared With Conventional Injection Molding
Conventional molding only forms plastic parts. With insert molding you place the insert inside the tool before the shot. In this way you combine two materials in one step. This often cuts assembly time. It also reduces variation between operators, because one machine does more of the job.
When you compare insert molding vs overmolding, the key point is simple. Insert molding uses a solid preformed insert. Overmolding covers an existing plastic part with a second material, usually for grip, sealing, or a softer touch.
How Does Insert Injection Molding Work?
On the work floor, the work flow stays much the same from round to round. If you need to tell how insert injection molding works to a buyer or a new pal, it helps to split the process into a few clear parts. And describe each part in plain talk.
Step by Step Insert Molding Process
First, inserts arrive from machining or stamping. They are cleaned, dried, and checked. Next, an operator or a robot places them in small nests or pins inside the cavity. Then the mold closes and the machine injects plastic. The plastic fills the space around the inserts, packs, and cools.
After that, the mold opens. Ejector pins push out the finished part. The operator does a quick visual check to see if every insert is present and sits in the right place. This insert molding process repeats many times per hour. Because of that, stable loading and simple nests matter a lot for smooth daily production.
Key Materials and Design Tips for Insert Molding
Material choice and insert layout both have a direct effect on how long the part lasts in real use. If this step is rushed, you may see early failures in the field or need changes later that cost more than the original tool.
Key Plastic and Metal Choices
Usual resins include ABS, PC, PA6, and PA66. Sometimes glass fiber is added to boost hardness and heat fight. These stuffs can run into narrow gaps but still keep power around the inserts. On the metal side, copper, brass, carbon steel, and stainless steel are all usual picks for metal insert molding.
When you plan insert molding materials, think about molding heat and use heat. Also think about any chance of rust or metal rot at the join between metal and plastic. These easy checks help you skip cracks, loose inserts, or bad touch after long use.
Practical Insert Molding Design Tips
Good insert molding design starts with stable seating of the insert. The pocket in the cavity should locate it without wobble, so it does not tilt when plastic hits the surface. Small ribs or steps can stop rotation. Generous fillets help spread stress away from sharp corners near the insert.
You should pay attention to gate position, wall thickness around the insert, and any area where the plastic section changes suddenly. Sudden change often brings sink marks or high stress. In some families of parts, a custom multi cavity mold for the simpler pieces and insert molding for the critical ones gives a balanced mix between tooling budget and daily output.
When the part will finally run in a custom multi cavity mold, you also need to think about cavity balance and how easy it is to load each insert in the same way in every cavity.
Typical Insert Molding Applications
Insert molding applications cover many industries. In vehicles, machines, and daily products, you see parts that carry load, conduct electricity, or hold a thread in one compact shape. In many of these parts, precise injection molding inserts keep pins straight, hold seals in place, and stop screws from stripping after repeated service work.
Small power plugs, relay bases, sensor housings, and switch parts often use insert injection molding. The process joins metal and plastic in tight spaces and keeps the layout neat. When one product includes several of these parts, using a high-efficiency multi cavity mold for high-volume components can keep the whole line running at a stable pace and reduce waiting time between steps.
Common Problems and Cost Considerations in Insert Molding
Like any process, insert molding has weak points. If you do not plan for them, scrap rates rise and operators get frustrated. A short talk with your mold supplier early in the project can cut trial and error around insert molding defects and solutions and gives you a clearer path before steel is cut.
Typical Defects and Simple Fix Ideas
Common defects include short shots around the insert, burn marks at sharp corners, flash near the parting line, and inserts that move out of place during filling. Many of these issues link back to poor insert seating, tight flow paths, or weak venting. Better nests, smoother flow paths, and clear work instructions often help more than complex machine settings.
Simple gauges that check insert height and position before molding can reduce scrap. They are easy to use on the line. Over time, this kind of small tool builds a habit of checking, so problems are caught earlier and do not turn into whole-box scrap.
Cost Factors You Should Notice
Insert molding cost comes from more than just the mold. You pay for insert machining or purchase, cleaning, loading time, and the extra checks that confirm every insert is present. At low volume, an operator can handle loading by hand and still keep a fair cycle time. At higher volume, you may justify simple automation to keep cycles stable and reduce labor per part.
When your parts list grows and you add more plastic components, working with an experienced multi cavity mold manufacturer helps you decide which items move to multi cavity tools and which stay in insert molds. That choice affects both investment and daily cost, so it makes sense to talk about it early rather than wait until capacity is already too tight.
Why Use Insert Molding for Mass Production?
Once the design is stable and volume rises, insert molding for mass production becomes a strong option. You want steady quality and predictable output so planning, stock, and delivery stay under control instead of jumping up and down from week to week.
Automation, Output, and Tooling Choices
Robots or bowl feeders can place inserts faster and in the same way every time. This cuts variation between shifts and keeps operators from doing the same tiny motion all day. For long running products, insert molding combined with well planned tooling lets one press turn out parts day after day with little drama.
When demand keeps rising, pairing insert molds with a custom multi cavity mold in the same plant often gives you more capacity without changing the basic part design. This mix of tools lets you grow output step by step instead of jumping to a completely new process.
Why Choose HEYAN TECHNOLOGY for Precision Molds
HEYAN TECHNOLOGY, formally Foshan Heyan Precision Mold Technology Co., Ltd., focuses on precision molds for preforms, caps, and other packaging parts in markets that demand stable quality. The company runs more than 5,000 square meters of factory space in Foshan, with over 150 sets of machining, EDM, and inspection equipment for complex tooling. Engineering, R&D, and project teams work together so mold structures fit real plant conditions, not just drawings on paper. With more than 15 years of production experience and a clear quality-first mindset, HEYAN TECHNOLOGY supports customers who need reliable molds for long running projects and care about consistent and clean output.
FAQ
Q1: What is insert injection molding mainly used for? A: It is mainly used when you need metal strength or special inserts and also want the shape, insulation, or appearance of plastic in a single part. Typical cases include threaded bosses, power plugs, sensor housings, and small gears with metal hubs.
Q2: How insert injection molding works in daily production? A: Inserts are cleaned and placed in the mold, the mold closes, and plastic is injected around them. After cooling, the mold opens and the finished part drops out with metal and plastic locked together. The cycle then repeats with the next set of inserts, often many times in one hour.
Q3: What are the main advantages of insert molding for engineers and buyers? A: The main advantages of insert molding are fewer separate parts, less manual assembly, and stronger joints compared with pressing or welding metal into plastic later. This often gives you more stable quality and lower total cost over the life of the project, especially when products run for many years.
Q4: Does insert molding always need automation to be economical? A: No. For small and medium batches, a trained operator can load inserts by hand and still keep a reasonable cycle time. Automation becomes more attractive when volumes rise or when the inserts are very small, hard to hold, or need very tight position control.
Q5: How can you cut defects in insert molding without huge changes? A: You can start by improving insert nests, checking venting near tight areas, and standardizing work steps for loading and inspection. Small changes here often reduce scrap and give you a clearer picture of which issues truly need tool or process changes, and which ones are just handling problems.