
Why Your Cap Mold Is Failing: Top Mistakes That Cost You Time and Money
When a cap mold starts slipping, it doesn’t announce itself loudly. Small warning signs show first — a little flash on a few cavities, a cap that won’t seal right, or a mold that suddenly needs manual watching instead of running lights-out. Then it gets costly. Adding one second to cycle time across thousands of shots per shift equals real money. A scrap rate rising from 0.5% to 1% might look minor, but bad caps quickly fill bins and eat profit. Customer complaints soon follow when threads feel rough or seals leak.
This is why mold condition matters. You’re not just making caps — you’re protecting output, labor, and your brand’s reputation. Here’s what typically causes mold failure, what it costs, and what can prevent it.
The Hidden Cost Of Cap Mold Failure
A weak mold costs in three ways: scrap, downtime, and repair work. You lose output when cavities are blocked, speed when you slow down to hold quality, and trust when caps show visible flaws. If two cavities in a multi-cavity mold are flashing, you must either block them off or keep running junk. Both hurt profit. Sorting later wastes labor and still risks defective parts shipping out. Most of these failures aren’t random; they come from the same few technical issues.
Why Are You Seeing the Same Defects Again and Again?
Repeated bottle cap mold problems point to mold wear, not resin or settings. The common defects are predictable — flash, short shots, warpage, and ejection issues.
Flash at the Parting Line
Flash happens when the mold halves no longer close tight. Worn leader pins, bushing play, or clamp imbalance open a gap where resin seeps out, forming a thin fin. That fin ruins sealing and thread fit. Fix it early — resurface the parting line and replace worn alignment parts before “just trimming it” becomes a habit.
Short Shots and Incomplete Caps
Short shots mean blocked flow or early freeze-off. Maybe the gate is too small, or one cavity bank runs cold. The result is thin threads, missing ribs, or half-filled tops. Use temperature mapping and fill balance checks to find which cavity freezes first and fix the cooling before uneven caps reach customers.
Warpage and Ovality
Warped caps look off-center or fail to seal. Uneven cooling or ejection stress causes this. Thin-wall closures are sensitive — just a few degrees’ difference builds internal stress that releases after demold. Balanced cooling and adjusted ejection timing usually solve it.
Sticking During Ejection
Caps that drag or scuff during ejection often suffer from poor surface finish or trapped gas. Gas burns onto steel, roughening it. That roughness grabs plastic, leaving scratches or white marks. Routine vent cleaning and polishing, plus balanced ejector layout, keep release smooth and prevent tamper band deformation.
Cooling Is Quietly Killing Your Cycle Time
Cooling consumes up to 70% of cycle time in high-speed molding. When it’s off balance, hot spots form. Hot spots make soft parts that warp or crush when gripped by the robot. Operators slow the press to cope, but that raises cost per cap. Cooling isn’t guesswork — it’s measurable.
Measuring Cooling Imbalance
Track inlet and outlet water temperatures. A big delta means that circuit works harder — the related cavity bank runs hotter or colder. Even a few degrees can distort thin parts. Low flow from scale or rust reduces heat removal, extending cycle time and hurting stability.
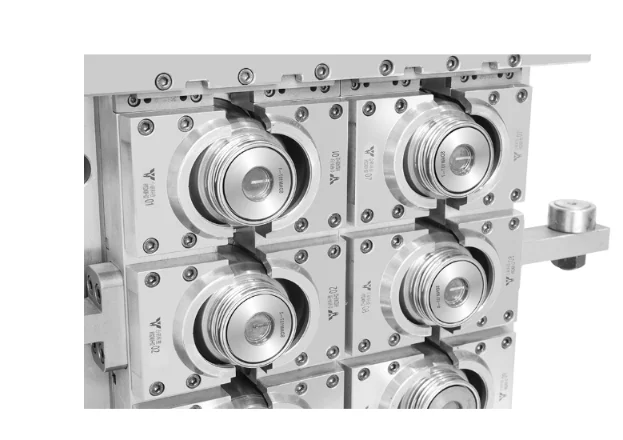
Channel Layout and Water Quality
Cooling channels must stay close enough to the cavity surface to remove heat fast but not weaken steel. Balanced, parallel channels beat a single long loop. Baffles, bubblers, and spiral inserts push water behind threads and tamper bands. Even trimming 0.8 seconds per shot can lift output significantly. Regular descaling keeps water flow stable — scale buildup acts like clogged arteries, leading to warped or soft caps.
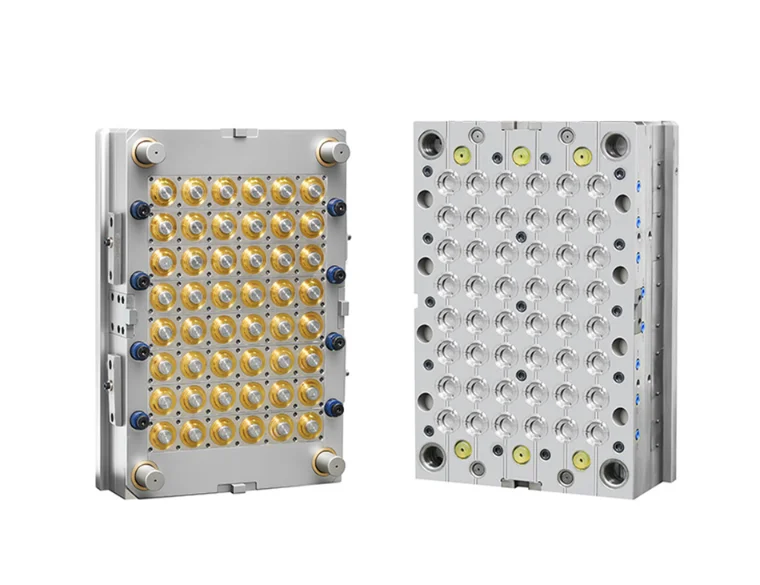
Steel Wear and Alignment Mistakes You Can’t Ignore
Cap mold life depends on steel, surface finish, and alignment. Over time, wear shows as flash, dull threads, or drag marks. Misalignment damages sealing zones, while worn finishes scratch caps. Inspect leader pins and parting lines routinely; early lapping is cheaper than rejecting whole batches. Keep friction zones polished and consider coated inserts for longer durability and sharper detail.
Maintenance Habits That Shorten Mold Life
Molds don’t fail suddenly — they die from neglected basics. Consistent maintenance avoids most “emergencies.” A practical schedule many plants use:
| Task | Frequency | What You Check |
|---|---|---|
| Alignment / Parting Line | Weekly | Gaps, wear, or offset |
| Cooling Circuits | Monthly | Flow, scale, leaks |
| Vent Cleaning | Weekly | Carbon buildup, blocked slots |
| Ejector System | Weekly | Drag, uneven ejection |
| Full Tear-Down & Polish | 3–6 Months | Core wear, thread sharpness |
Production data helps too. If records show “Cavity 12 flashes after 400k cycles,” the toolroom knows where to act before it fails again. Safe handling also matters — a dropped mold is the costliest “maintenance event” imaginable. Using designed ring lifting points reduces risk when moving heavy tooling.
When To Repair and When To Rebuild?
Sometimes repair stops making sense. When flash returns right after dressing, cycle time won’t drop, cooling leaks keep coming back, and threads dull across multiple cavities — the mold has reached its end. Rebuilding or replacing protects product quality, delivery, and reputation. Buyers don’t want excuses; they want clean, consistent caps.
Company Profile
Foshan Heyan Precision Mold Technology Co., Ltd. designs and manufactures high-precision molds for caps, closures, and lifting structures. Its work centers on multi-cavity, thin-wall, and high-speed molding — where cooling balance, venting, and dimensional accuracy decide productivity. The company provides design, CNC machining, assembly, and long-term servicing, plus safety guidance for mold handling. This includes support for cap and ring lifting systems, helping customers achieve stable output and long mold life through better tooling practices.
FAQ
Q1: What Causes Flash on a Cap Mold?
A: Misalignment, worn guide parts, or weak clamp force. The resin seeps through and forms a fin that ruins sealing. Early repair saves sorting costs.
Q2: Why Are Caps Not Filling Completely in a Bottle Cap Mold?
A: Restricted flow or unbalanced cooling. Temperature mapping shows which cavity freezes first.
Q3: How Can Cooling Problems Slow Down Production?
A: Hot spots make soft parts that warp. Balanced water flow and clean circuits keep cycle time steady.
Q4: How Often Should a Cap Mold Be Serviced?
A: Weekly alignment checks, monthly cooling inspection, and full teardown every 3–6 months prevent flash and sticking.
Q5: When Is It Time To Replace a Mold?
A: When flash, leaks, and rising scrap all appear together. At that point, a new cap mold or rebuild costs less than unstable production.